Sunday, March 29, 2009

Force Printing Large Page Into One Paper on Excel

7:41 AM Posted by: ayrinz-keea 0 comments

How to print a large into one paper in Excel? Sometime you need it to save paper or just for analyzing the data. There are several ways to do it.


First, adjust paper margin on page setup to its minimum value. Change page orientation if necessary.


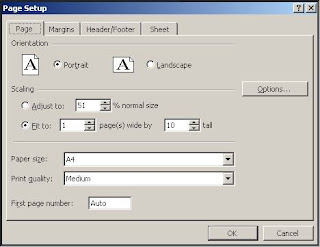
Excel page setup


Second, you may choose one of two following:

1. Manual page break. To adjust page break manually, go to View - Page Break Preview. Click OK if you get welcome message. In Page break preview, you can adjust the pages by click and drag the blue solid border or dash blue border.


2. Scaling your document automatically. To scale document automatically, go to File - Page Setup. On Page tab adjust to xxx% normal size. That the first option. Second option is Select the Fit to check box, enter a number in the page(s) wide by box, and enter a number in the tall box. To fill the paper width and use as many pages as necessary, type 1 in the pages(s) wide by box and leave the tall box blank.


Excel fit to pages


FYI, always use print preview to check every change you made to make sure that your printout will be still readable. Adjusting scaling to fewer percent or fitting pages into higher ratio may cause your text unreadable. In many cases I met, handling a large table only need to change the tall box value (to 8, 10 etc.) and leave the pages wide by box value is 1.


CMYK an RGB Color Model Introduction

7:38 AM Posted by: ayrinz-keea 0 comments

Every image has a color palette. They could be black and white, grayscale, duotone, RGB, CMYK and so on. There are 2 common color palette used in image processing; RGB (Red Green Blue) and CMYK (Cyan Magenta Yellow Black). Processing an image in unsuitable color could bring it to wrong color and disapointing result. To know this color differences is important for people who dealing with image processing.


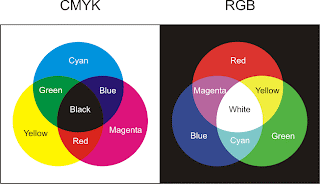
RGB formed from three main color; Red, Green and Blue on a black media. Your monitor uses RGB color. To display a color other than red, green and blue, monitor will mix two of that three color or mix all color with certain value. FOr example, yellow produced by mixing red and green. Magenta is mixed of blue and red, etc.


RGB and CMYK color diagram


CMYK or CMY formed from four main color; Cyan, Magenta, Yellow and Black on a white media. CMYK used in printed images on paper. Most printer use CMYK method to produce an image.


Because monitor uses RGB and printer uses CMYK that's why the printout will not produce exact color as you see on the monitor. To obtain optimal result between color in monitor and printout, you have to calibrate the monitor.


Conclusion: for displaying purpose, use RGB to match your monitor, otherwise for printing purpose, use CMYK.


Comparing Image File Format; JPG, BMP, TIFF, GIF, PNG and Usages

7:33 AM Posted by: ayrinz-keea 0 comments

Here I want to give a short comparison and description of some most popular image file format. This article made based on my understanding of those image file format which I got from my experience and some sources. I will only consentrate to common Bitmap format since there are two (CMIIW) image format used widely; Vector and Bitmap/raster image format. Of course, besides the charateristics of JPG, GIF, PNG, TIFF and BMP file format, I will try to give short desription of usages of each format.


1. JPEG

JPEG or JPG is most popular image format nowadays. JPG is lossy file format. Lossy means when you save a graphic or image in JPG format it will loss details and reduce quality depends on degree of compression and resolution of the image. Even so, JPG offer small file size. JPG commonly used for photographic images especially in large image dimension. JPG is best format if you want to share image over internet or display it on a site. For sharing image via email -just showing it to friends, for example, I think 800x600 resolution with compression 80% is enough. To get more detail, you can choose 1024x768 resolution, depends on your original resolution.


JPG file with quality 50
Format: JPG Quality: 50; dimension: 200x100 px; filesize: 3 kb (zoomed 1.5x)


JPG file with quality 12
Format: JPG Quality: 12; dimension: 200x100 px; filesize: 2 kb (zoomed 1.5x)


On the other hand, JPEG is not as well suited for line drawings and other textual or iconic graphics, where the sharp contrasts between adjacent pixels cause noticeable artifacts. Such images are better saved in a lossless graphics format such as TIFF, GIF, PNG, or a raw image format. JPEG is also not well suited to files that will undergo multiple edits, as some image quality will usually be lost each time the image is decompressed and recompressed (generation loss). To avoid this, an image that is being modified or may be modified in the future can be saved in a lossless format such as PNG, and a copy exported as JPEG for distribution.


2. BMP

BMP is Windows image (and oldest?) format and free of patents that makes it very common format that any picture editing program from many operating system can read and write. BMP usually has a huge filesize due to lack of compression. My suggestion, avoid saving a picture in BMP because it takes a lot of space. When you perforce to store or deliver image in BMP, you can reduce its filesize by compressing first into ZIP or RAR format.


3. TIFF

TIFF is losless format. Even so, TIFF filesize relative small compared to BMP. TIFF is flexible format that able to be a container holding compressed JPG, also can include a vector based clipping path. TIFF is suitable to store image, and printing purpose format. TIFF also offer LZW compression (resemble to ZIP) to reduce filesize. TIFF also support multiple pages in single file.


4. GIF

GIF a lossless format used widely in internet graphic. GIF supports colors up to 256 colors only in an image. So if it is a photograph, for example, do not use GIF format to avoid losing image colors. GIF also support animation and of course contain multiple images. GIF suitable for sharp edges image line art (like logos).


5. PNG

PNG is lossless format made to replace GIF as a format not requiring a patent license. PNG support RGB and doesn't support CMYK. PNG designed for images on the internet, not professional printing. PNG supports transparency, so when you need to overlap an object with other, choose PNG for the foreground image. PNG filesize bigger than JPG and GIF. But image quality better than GIF since PNG support larger color and lossless. Though PNG designed to replace GIF, PNG doesn't support animation. Even so, Mozilla Foundation is developing animated PNG that'll make PNG format supports animation.


PNG file sample
Format: PNG dimension: 200x100 px; filesize: 4 kb (zoomed 2x)


Thursday, March 26, 2009

Things To Do After Windows OS Installation

7:08 AM Posted by: ayrinz-keea 0 comments

Yesterday we talked about preparation before reinstalling OS, now I'm gonna write things to do first after you finish reinstall Windows. Of course there are some things to do after Windows reinstallation in order that your PC ready to use.


1. Install devices driver

Device driver is a program that allows a specific device, such as a modem, network adapter, or printer, to communicate with the operating system. Although a device might be installed on your system, Windows cannot use the device until you have installed and configured the appropriate driver.


If a device is listed in the Hardware Compatibility List (HCL), a driver is usually included with Windows. Device drivers load automatically (for all enabled devices) when a computer is started, and thereafter run invisibly.


Read also for more information about installing devices driver.


2. Setup network and internet connection

To setup network and internet connection, go to Start > All Programs > Accessories > Connection > Network Setup Wizard or New Connection Wizard. If you don't a network or internet connection, pass this step and go to next step. I place setup network and internet connection on second place regarding you may want to download newest devices driver and typically you'll need it to update your antivirus definition which we will install it on the third step of this list.


3. Install antivirus and update it

Now you have all driver installed and your network or internet connected. Your computer now should run properly. But without antivirus your computer is vulnerable to virus attack and other malicious software.


Nowadays, there are a lot of antivirus either free or paid antivirus. For free antivirus, you can choose Avira Antivir, AVG Antivirus or other free antivirus. For paid antivirus there are many choices; Norton Antivirus, McAfee, NOD32, Kaspersky, Panda Antivirus etc. The free antivirus not always worse than the paid one. There are many case that the free antivirus works better than paid antivirus. The key is you have to update the antivirus regularly whether it is free or not. FYI, most antivirus need internet connection to update their database, some could be updated manually. Read also the post on how to manual update NOD32 antivirus.


4. Install applications

It is time to install applications. I suggest you to install 'big application' beforehand. Big application means application which the installer has more than 100 mb in size. IMHO, you have to install this first because big application has more complicated configuration and files and a lot of registry entry. So the principle is big first, small later.


5. Restore applications' configuration backup

After installed, for your frequently used application, you sometimes have to customize it to adjust as you need. Than reconfigure one by one, you can restore applications settings from back-up previously made. For MS Office, go to Start > All Programs > Microsoft Office > Microsoft Office Tools > Microsoft Office Save My Settings Wizard. Choose to restore configuration and follow next instruction in the wizard.


6. Tweaking to boost computer performance

Read how to boost your computer performance in the next post.


That's all things to do after Windows setup. Want to add?


2009 Video Editing. | Privacy Policy All rights reserved.
Powered by Beta Templates and Blogger.
Template and Icons by DryIcons.com